网上关于ssh证书登录(无密码登录)的文章重复率太高了,尤其CA签证的方式, 弄的很多人迷迷糊糊的, 其实CA签证这种方式99%的人根本用不到。
具体操作如下:
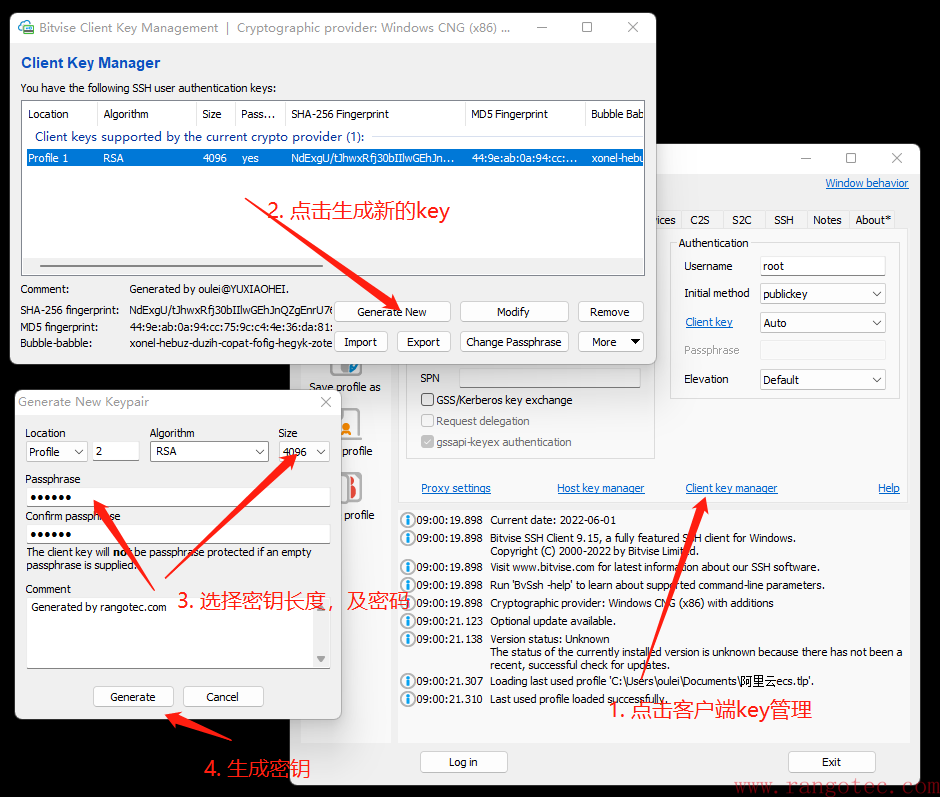
采用Putty 、Bivise SSH Client 、或者其他你常用的工具都可以,这里以Bitvise SSH Client 为例:
生成证书图示步骤如下:

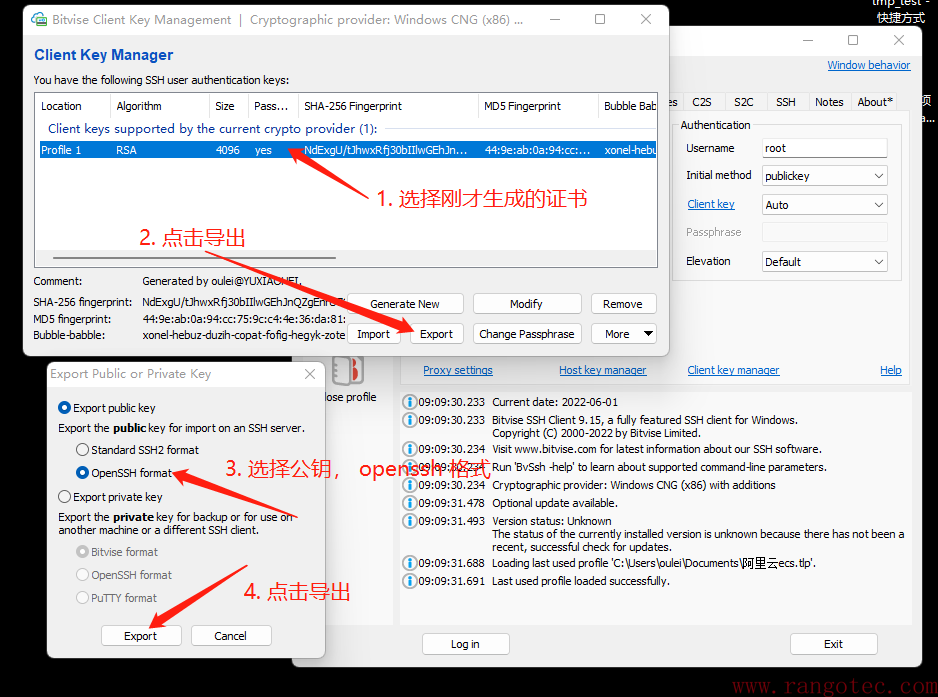
现在有了证书,接下来把公钥导出来,粘贴到服务器上就可以使用了。
导出步骤如下:

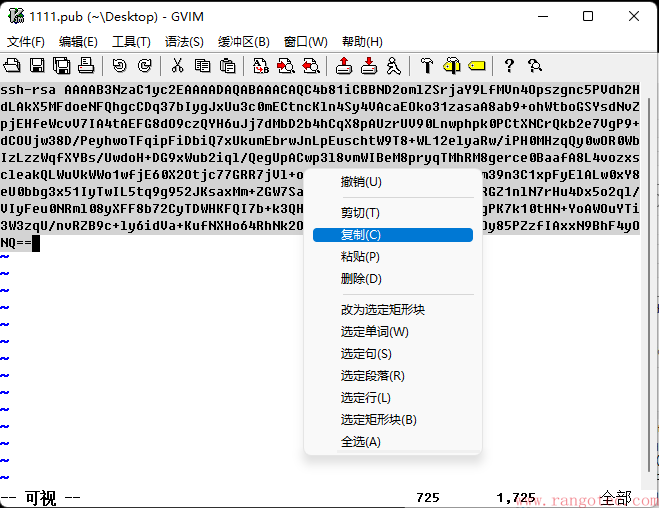
现在得到了导出的公钥,打开后内容如下,全选复制这串公钥。注意,这是一行字符串,没有换行。

打开openssh的配置文件 /etc/ssh/sshd_config 。
这几步默认的配置文件里都有,只需要取消注释(把开头的井号取消掉)即可,内容如下:
# 公钥认证,开启
PubkeyAuthentication yes
# 认证文件位置,取消井号注释,开启
AuthorizedKeysFile      .ssh/authorized_keys
# 空密码不允许登录
PermitEmptyPasswords no
# 密码认证不允许,等证书验证没问题后再禁用密码登录。
PasswordAuthentication no
然后 打开用户家目录下的 【~/.ssh/authorized_keys】 文件,把刚才复制的公钥粘贴进去。 有多人使用的话,一个公钥一行。
qgbf@rangotec.com $ vi ~/.ssh/authorized_keys

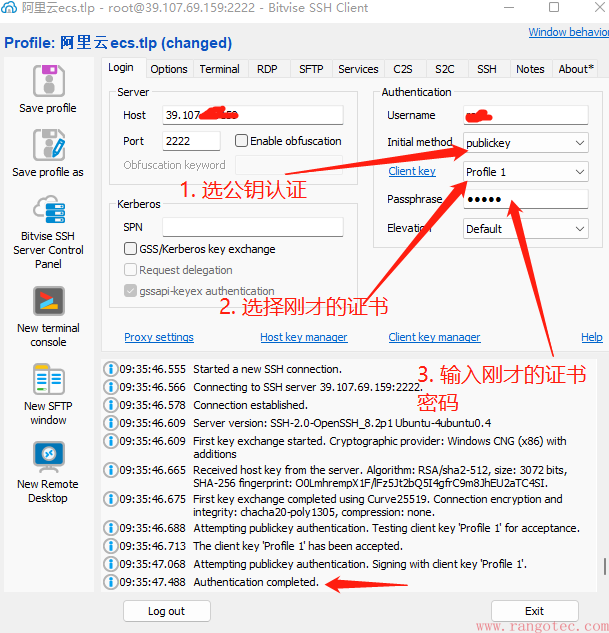
现在测试证书认证通过了,就可以把第二步里的密码认证关闭了。这样服务器只能用证书登录,当有人尝试用密码登录时,会报【密码认证失败,还可以尝试公钥登录】的错误。
09:41:58.057 Connection disconnected on user's request.
09:41:58.057 The SSH connection has been terminated.
09:41:59.136 Started a new SSH connection.
09:41:59.147 Connecting to SSH server 39.107.69.xxx:22.
09:41:59.165 Connection established.
09:41:59.199 Server version: SSH-2.0-OpenSSH_8.2p1 Ubuntu-4ubuntu0.4
09:41:59.199 First key exchange started. Cryptographic provider: Windows CNG (x86) with additions
09:41:59.264 Received host key from the server. Algorithm: RSA/sha2-512, size: 3072 bits, SHA-256 fingerprint: O0LmhrempX1F/lFz5Jt2bQ5I4gfrC9m8JhEU2aTC4SI.
09:41:59.281 First key exchange completed using Curve25519. Connection encryption and integrity: chacha20-poly1305, compression: none.
09:41:59.293 Attempting password authentication.
09:41:59.326 Authentication failed. Remaining authentication methods: 'publickey'.
09:42:00.774 Authentication aborted on user's request.
09:42:00.802 The SSH connection has been terminated.
附:
对于linux用户来说更简单,只需两条命令即可:
// 第一步 生成公钥、私钥
$ ssh-keygen   (根据需要配置,通常一路回车啥也不配置)

此时在 ~/.ssh 目录下有以下两个文件
id_rsa (私钥)
id_rsa.pub (公钥)

// 第二步 把公钥(~/.ssh/id_rsa.pub)上传到对应用户目录下; 如下命令上传到root目录下,即可以免密登录root
$ ssh-copy-id -i ~/.ssh/id_rsa.pub root@192.168.1.22

或者手动复制公钥(~/.ssh/id_rsa.pub) 追加到服务器上对应用户的authorized_keys里,如root用户的 /root/.ssh/authorized_keys; 一个公钥一行。

其他配置与上文相同。
相关文章: